
 Search
Chrome Gauge Ring and/or Gauge LEDs Install 00-03 Max - Written by Will
2 posters
Page 1 of 1
![]()
 Chrome Gauge Ring and/or Gauge LEDs Install 00-03 Max - Written by Will
![]() by Ghost Tue Mar 31, 2009 8:16 pm
by Ghost Tue Mar 31, 2009 8:16 pm
Looks like the TMEC site is not going to make it's way back this time, and since I had saved out the very well written "How To Do" by Will, I thought I would re-post it here for him.
I installed chrome gauge rings today on my Maxima SE, 2003 model, and documented the process (when I remembered to take pics! in case anyone wants to try it on there own. Sorry in advance; I am not a very good photographer.
Where people will have the most difficulty with this job is:
a) Having the balls to pull plastic pieces loose (you have to learn by feel)
b) Having the finger strength to pull out some harnesses
c) Putting the steering column trim piece back together
d) Removing the gauge cluster window without breaking it
e) Prying off the little buttons on the gauge bezel
If you are worried about any of the above, don't attempt.....but I still prefer you to try this on your own to gain confidence with your hands as well as get intimate with your car mechanically.
The good news is, all of the above can be overcome if you are careful!
Another tip: I DO NOT recommend doing this in winter. Perform this mod on a sunny afternoon with ambient temperatures above 17 degrees C. The reason is you want to remove plastic pieces when it's hot out because plastic is more flexible at warmer temperatures. When cold, plastic gets hard and brittle, which could crack or snap easier.
Tools needed: #1 Phillips screwdriver; 3/8" ratchet with extension, 12mm socket, #1 Phillips stubby screwdriver (optional), and small flat screwdriver (optional)
If you don't know what the above tools are, don't attempt. Seriously.
The procedure for getting into the gauges is similar to the 4th gen, with one extra minor step.
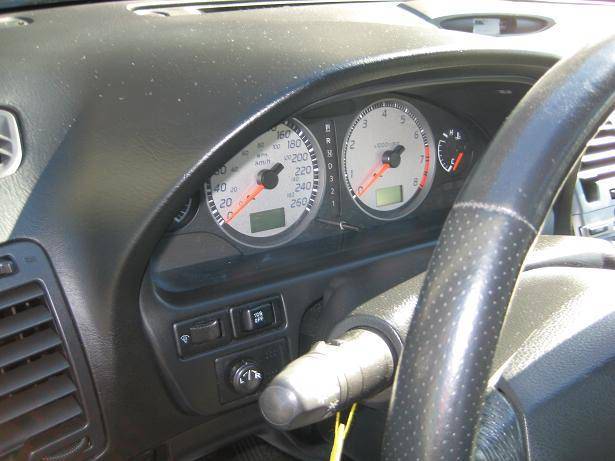
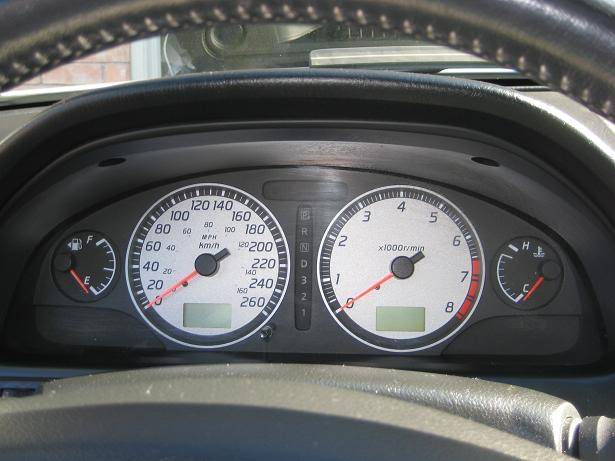
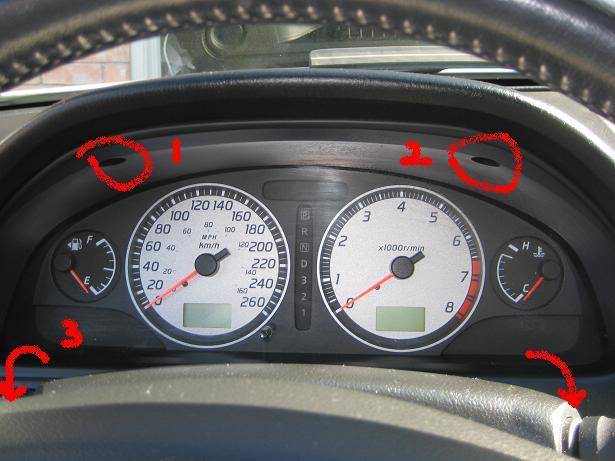
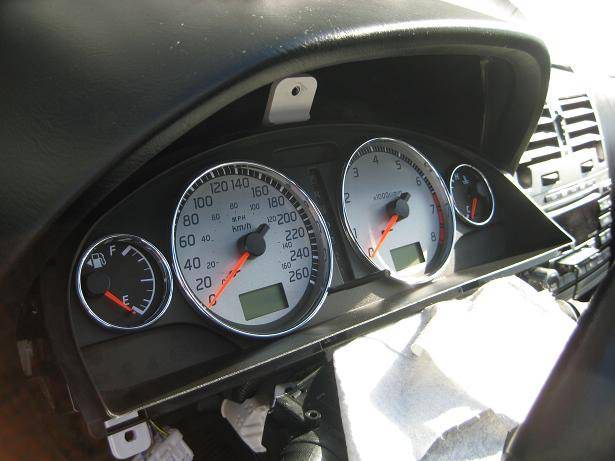
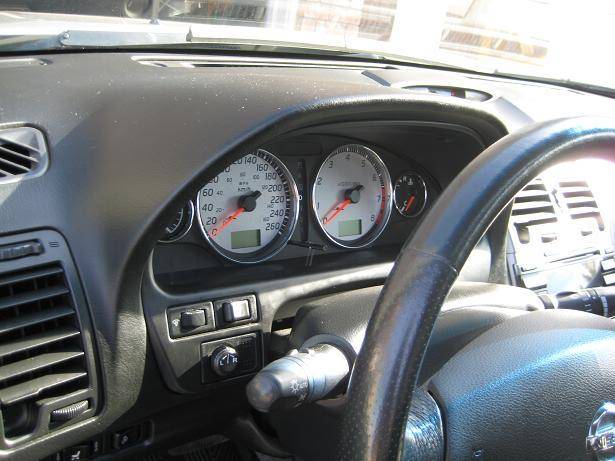
Here's how the gauges look before we begin surgery!!
Step 1
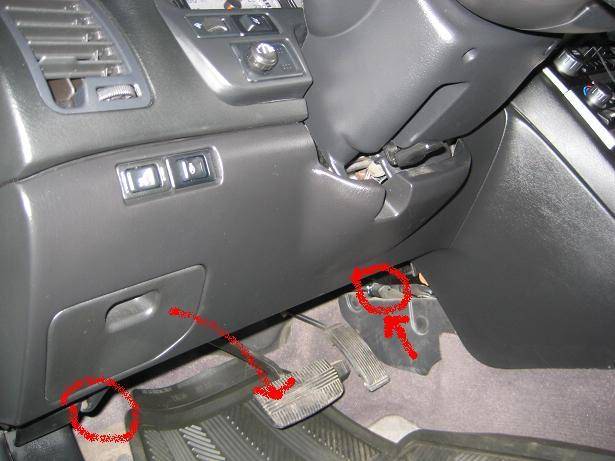
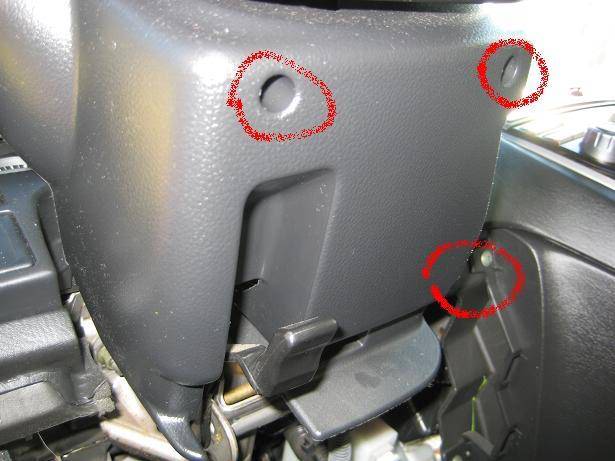
Remove the panel underneath. There are 2 screws on either side circled in red. Remove them with the phillips screwdriver. Remove the fuse cover as well so you can see how the panel clips on, and then gently grasp on top and pull down gently until it gives. DO NOT yank. It should come out. When it unclips, disconnect the memory seat and heated steering wheel harnesses (if so equipped).
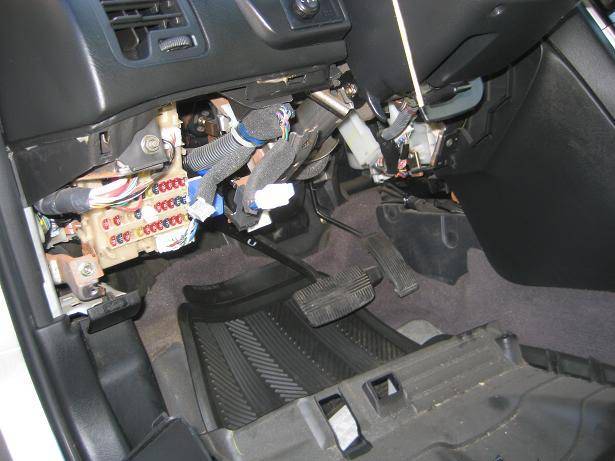
Here's how it looks underneath with the panel off:
STEP 2
Remove the steering column trim. This is a 2-piece unit, and get it off by first looking at your ignition switch, and then pulling out the plastic trim piece around it. Just dig and pull out and it'll come off (no pic - it's too easy). Afterward, get at the 3 screws as per below circled in red. When you get the screws out, just grasp and pull apart and they'll come loose into 2 pieces.
STEP 3
There are 2 options here. I did Option A
Option A (the "damage-proof" option)
Unscrew the 2 screws on top of the gauge cluster bezel. Once you do that, pull out and down gently until the bezel breaks loose. Don't force it out. Just leave it loose for now.
With it loose, look and/or reach behind on the right side, and unclip the auto climate control air sensor plug (small white one) and detach the plastic air sensor tube (if so equipped). Move to the left now. From behind, PUSH the power mirror switch out from its housing, and then unplug. With the power mirror switch out, unplug the dimmer and TCS switches from behind. Leave the gauge bezel as-is....for now. It isn't going anywhere.
Option B
Option B is to wrap the head of a small flat screwdriver with a thin cloth (i.e. J-Cloth), and then pry out the dimmer switch, TCS switch and power mirror switch. You're prying these out so you can unplug them and remove the bezel without incident. I recommend Option A because it may create less damage. Prying is hit-and-miss; sometimes you poke nicks on your switches if they are stubborn like they always are.
If you choose this step, pry and then remove the harnesses from the switches. Afterwards, leave the gauge bezel as-is....for now. It isn't going anywhere.
STEP 4
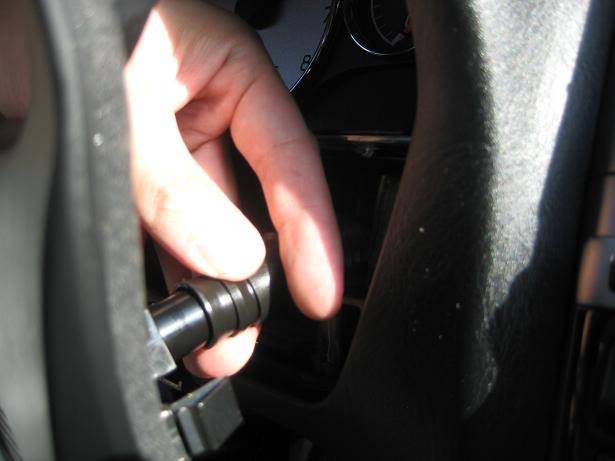
This step is required in 5th gens, but not in 4th gens in order to get more clearance to get the gauge bezel out. Look underneath. You'll see 12mm nuts as shown here circled:
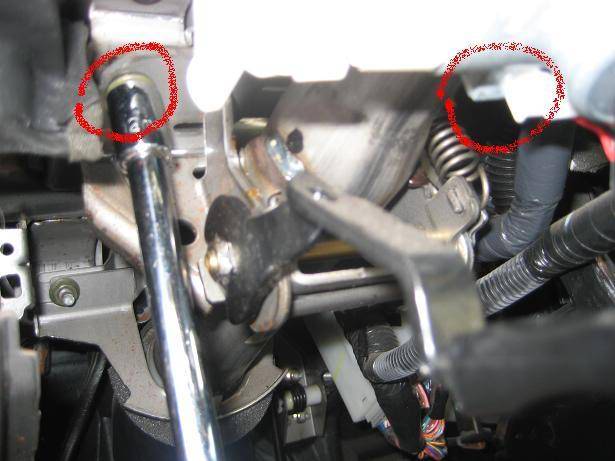
DON'T remove them! Just loosen each nut a few turns until you notice the steering column moving down. Lower just enough that you get room to remove the gauge bezel. You can see my 12m socket...that's what you need attached to an extension and ratchet.
STEP 5
Now you will see 3 screws holding the gauge cluster. One on top, 2 on the bottom left and right respectively. Remove those, and you can now unplug the 3 harnesses in the back to get the cluster out, or work on it with the harnesses in by pulling it forward and resting it on top of the steering column with the cloth underneath like the below. I chose to keep the harnesses in because they are extremely difficult to remove without hurting your fingernails:
STEP 6
For chrome gauge rings, remove the gauge cluster window. Be VERY careful and patient here. Push down and out on one locking tab. When you get one loose, the rest is easy. (NOT PICTURED - Self explanatory when you see it.) Hold the unclipped tab, and then work on each tab individually until you get the whole window out. I suggest starting with the top clips since there are more of them on top.
For LEDs, simple. Turn the gauge cluster back and remove whatever bulbs and install your LEDs
STEP 7
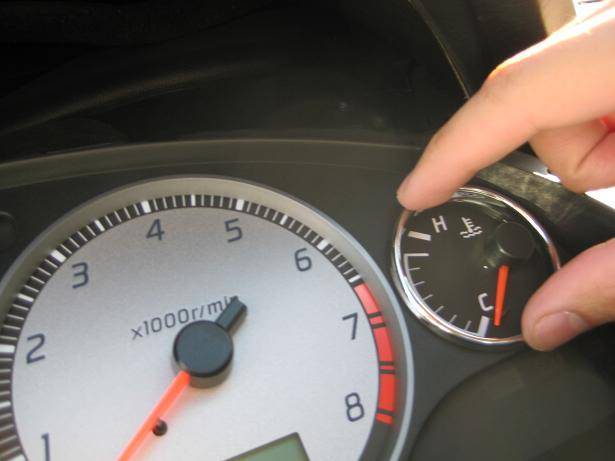
Press the gauge rings in gently, and apply light pressure all around for each ring. Don't I have a nice thumb and forefinger?
Looking' good
Looking' FINE with a brand-new gauge cluster window
STEP 8
When the rings look good, press the gauge cluster window back on carefully, and re-install everything back in reverse order.
When the LEDs are put in, turn on your parking lights, and cup your hands around all key areas within the gauge cluster to make sure all LEDs are lighting up! Make damn sure they work now so you don't find out something is amiss once everything is put back together!
DON'T FORGET to re-tighten the 12mm nuts to restore the position of the steering column AFTER you put the gauge bezel back on

....and DON'T FORGET to re-attach the small harness and plastic tube for your interior air intake sensor for the automatic climate control unit (if so equipped).
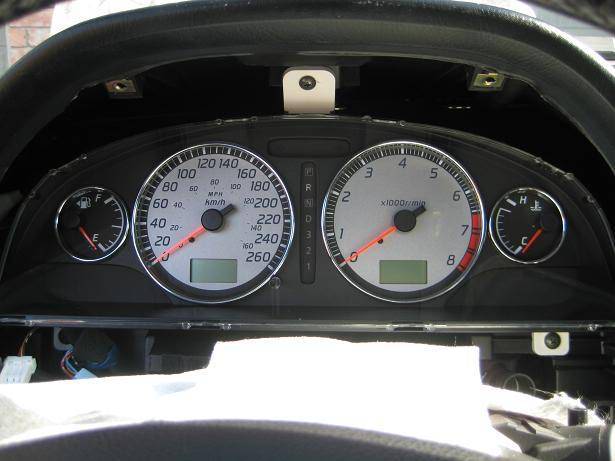
For chrome gauge rings, when you finish, this is how it looks. WOOO!

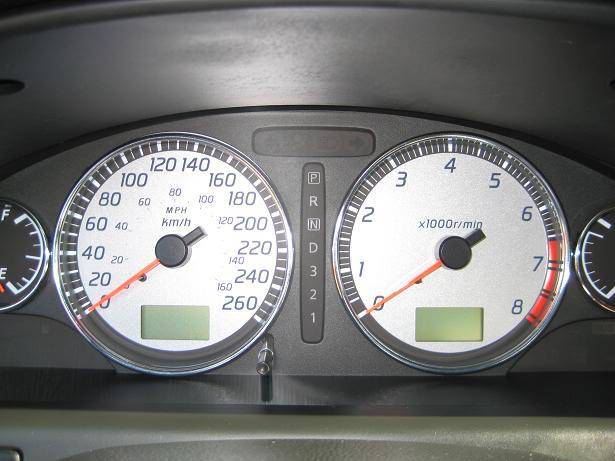
All tidied up after finishing!

Good luck. You can do it.
I installed chrome gauge rings today on my Maxima SE, 2003 model, and documented the process (when I remembered to take pics! in case anyone wants to try it on there own. Sorry in advance; I am not a very good photographer.
Where people will have the most difficulty with this job is:
a) Having the balls to pull plastic pieces loose (you have to learn by feel)
b) Having the finger strength to pull out some harnesses
c) Putting the steering column trim piece back together
d) Removing the gauge cluster window without breaking it
e) Prying off the little buttons on the gauge bezel
If you are worried about any of the above, don't attempt.....but I still prefer you to try this on your own to gain confidence with your hands as well as get intimate with your car mechanically.
The good news is, all of the above can be overcome if you are careful!
Another tip: I DO NOT recommend doing this in winter. Perform this mod on a sunny afternoon with ambient temperatures above 17 degrees C. The reason is you want to remove plastic pieces when it's hot out because plastic is more flexible at warmer temperatures. When cold, plastic gets hard and brittle, which could crack or snap easier.
Tools needed: #1 Phillips screwdriver; 3/8" ratchet with extension, 12mm socket, #1 Phillips stubby screwdriver (optional), and small flat screwdriver (optional)
If you don't know what the above tools are, don't attempt. Seriously.
The procedure for getting into the gauges is similar to the 4th gen, with one extra minor step.
Here's how the gauges look before we begin surgery!!
Step 1
Remove the panel underneath. There are 2 screws on either side circled in red. Remove them with the phillips screwdriver. Remove the fuse cover as well so you can see how the panel clips on, and then gently grasp on top and pull down gently until it gives. DO NOT yank. It should come out. When it unclips, disconnect the memory seat and heated steering wheel harnesses (if so equipped).
Here's how it looks underneath with the panel off:
STEP 2
Remove the steering column trim. This is a 2-piece unit, and get it off by first looking at your ignition switch, and then pulling out the plastic trim piece around it. Just dig and pull out and it'll come off (no pic - it's too easy). Afterward, get at the 3 screws as per below circled in red. When you get the screws out, just grasp and pull apart and they'll come loose into 2 pieces.
STEP 3
There are 2 options here. I did Option A
Option A (the "damage-proof" option)
Unscrew the 2 screws on top of the gauge cluster bezel. Once you do that, pull out and down gently until the bezel breaks loose. Don't force it out. Just leave it loose for now.
With it loose, look and/or reach behind on the right side, and unclip the auto climate control air sensor plug (small white one) and detach the plastic air sensor tube (if so equipped). Move to the left now. From behind, PUSH the power mirror switch out from its housing, and then unplug. With the power mirror switch out, unplug the dimmer and TCS switches from behind. Leave the gauge bezel as-is....for now. It isn't going anywhere.
Option B
Option B is to wrap the head of a small flat screwdriver with a thin cloth (i.e. J-Cloth), and then pry out the dimmer switch, TCS switch and power mirror switch. You're prying these out so you can unplug them and remove the bezel without incident. I recommend Option A because it may create less damage. Prying is hit-and-miss; sometimes you poke nicks on your switches if they are stubborn like they always are.
If you choose this step, pry and then remove the harnesses from the switches. Afterwards, leave the gauge bezel as-is....for now. It isn't going anywhere.
STEP 4
This step is required in 5th gens, but not in 4th gens in order to get more clearance to get the gauge bezel out. Look underneath. You'll see 12mm nuts as shown here circled:
DON'T remove them! Just loosen each nut a few turns until you notice the steering column moving down. Lower just enough that you get room to remove the gauge bezel. You can see my 12m socket...that's what you need attached to an extension and ratchet.
STEP 5
Now you will see 3 screws holding the gauge cluster. One on top, 2 on the bottom left and right respectively. Remove those, and you can now unplug the 3 harnesses in the back to get the cluster out, or work on it with the harnesses in by pulling it forward and resting it on top of the steering column with the cloth underneath like the below. I chose to keep the harnesses in because they are extremely difficult to remove without hurting your fingernails:
STEP 6
For chrome gauge rings, remove the gauge cluster window. Be VERY careful and patient here. Push down and out on one locking tab. When you get one loose, the rest is easy. (NOT PICTURED - Self explanatory when you see it.) Hold the unclipped tab, and then work on each tab individually until you get the whole window out. I suggest starting with the top clips since there are more of them on top.
For LEDs, simple. Turn the gauge cluster back and remove whatever bulbs and install your LEDs
STEP 7
Press the gauge rings in gently, and apply light pressure all around for each ring. Don't I have a nice thumb and forefinger?
Looking' good
Looking' FINE with a brand-new gauge cluster window
STEP 8
When the rings look good, press the gauge cluster window back on carefully, and re-install everything back in reverse order.
When the LEDs are put in, turn on your parking lights, and cup your hands around all key areas within the gauge cluster to make sure all LEDs are lighting up! Make damn sure they work now so you don't find out something is amiss once everything is put back together!
DON'T FORGET to re-tighten the 12mm nuts to restore the position of the steering column AFTER you put the gauge bezel back on
....and DON'T FORGET to re-attach the small harness and plastic tube for your interior air intake sensor for the automatic climate control unit (if so equipped).
For chrome gauge rings, when you finish, this is how it looks. WOOO!
All tidied up after finishing!
Good luck. You can do it.

Ghost- Number of posts : 207
Location : Burlington, Ontario
Registration date : 2008-04-21
![]()
![]()
Re: Chrome Gauge Ring and/or Gauge LEDs Install 00-03 Max - Written by Will
![]() by Will Tue Mar 31, 2009 8:21 pm
by Will Tue Mar 31, 2009 8:21 pm
Thanks very kindly Ghost for having saved this!
I had a write-up for VQ35 spark plugs that I posted on TMEC in Sept 2007 that got lost too.
When I do the fuel filter this weekend, I'll try to document it too to try and share my way to do it....I read write-ups sometimes, but never follow any of them by the letter. Anyone mechanically savvy finds their own way to get the job done.
Will- Number of posts : 88
Location : Halton
Registration date : 2008-03-21 -

![]()
![]()
Re: Chrome Gauge Ring and/or Gauge LEDs Install 00-03 Max - Written by Will
![]() by Ghost Tue Mar 31, 2009 8:45 pm
by Ghost Tue Mar 31, 2009 8:45 pm
Was glad I had saved the whole article Will ... I remember all to well all the really good ones that became lost, I had enjoyed the detail on the Bose fix for the audio cut out so I had saved that one. Ray wrote a very good one for changing the dash bulbs to LED's and I had saved that one as well as this one. These how to do are well written and contain multiple great picture's that really help show the way, even if you are one to wonders off the script a bit having picture's can always show you where you are incase one does get lost.
Ghost- Number of posts : 207
Location : Burlington, Ontario
Registration date : 2008-04-21
![]()
![]()
Re: Chrome Gauge Ring and/or Gauge LEDs Install 00-03 Max - Written by Will
![]() by Will Wed May 14, 2014 10:11 am
by Will Wed May 14, 2014 10:11 am
Wow, old memories. My interior looks SO different now after 5-6 years. One of the best mods I have, and I have you to thank for ordering me a set as they are now discontinued from Paradox Systems.
Will- Number of posts : 88
Location : Halton
Registration date : 2008-03-21 -
![]()
![]()
Re: Chrome Gauge Ring and/or Gauge LEDs Install 00-03 Max - Written by Will
![]() by Ghost Thu May 15, 2014 9:30 pm
by Ghost Thu May 15, 2014 9:30 pm
Wow is correct Will ... you now have all that woodgrain finish in your car, but you are correct that our clusters are rather plain jane looking but the chrome rings certainly do finish off the look of the cluster
Ghost- Number of posts : 207
Location : Burlington, Ontario
Registration date : 2008-04-21
![]()
![]()
Sponsored content
![]()
![]()
![]()

 Similar topics
» Convert Gauge Cluster Bulbs to LED's. 02-03 - By knight_yyz
» Stillen classic lip install
» 5th Gen VIS CF hood install issues.
» Aiming headlights lower after hid install
» Sneak Peak of the weekends install :P
» Stillen classic lip install
» 5th Gen VIS CF hood install issues.
» Aiming headlights lower after hid install
» Sneak Peak of the weekends install :P
Page 1 of 1
Permissions in this forum:
You cannot reply to topics in this forum|
|
|